
Pi hole monitoring with the Media Center HAT
This guide will show you how to setup and configure your Pi hole to display the pi hole system status and ads blocked using the Pi Supply Media Center HAT. The Pi Supply Media Center HAT is a 2.8″ TFT display that connects to your Raspberry Pi, and includes other feature such as IR receiver, restive touch and navigation buttons that can be soldered to the PCB.
What you need
- Raspberry Pi computer
- microSD card
- Power Supply
- Mouse & Keyboard (initial configuration)
- Media Center HAT
- Media Center HAT Case (optional)
Getting Started
Step 1 – First you need to assemble your hardware. Connect the Media Center HAT on top of the Raspberry Pi, making sure that the header is pushed down firmly on the Raspberry Pi’s GPIO header.


If you are going to use the Media Center HAT case then insert the Raspberry Pi and Media Center HAT into the bottom half of the case, making sure that both boards align up with the groves/slots within the case. If using anything other than a Raspberry Pi 4B then you will need to push the cutout where the HDMI connector is.


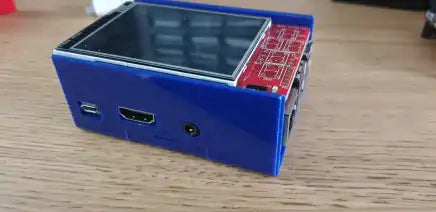
Finally add the top half of the case.

Step 2 – Connect your peripherals. Before you power up the Pi hole connect all your peripherals such as Ethernet cable, HDMI cable, Keyboard & Mouse and also insert the micro SD card into the Raspberry Pi.

Finally apply power to the Raspberry Pi to boot up your pi hole.
Step 3 – If you have already installed the Pi hole software then you can skip to the next step. Open up a terminal window or from the command line type in the following to setup and configure the Pi hole:
curl -sSL https://install.pi-hole.net | bash
Step 4 – Install the Media Center HAT software. We want to display the main output on the TFT display only, from the command line type in the following:
sudo su -c "bash <(wget -qO- https://pisupp.ly/test)" root
When prompted make sure you select TFT as the output and also ensure you activate the boot to console.
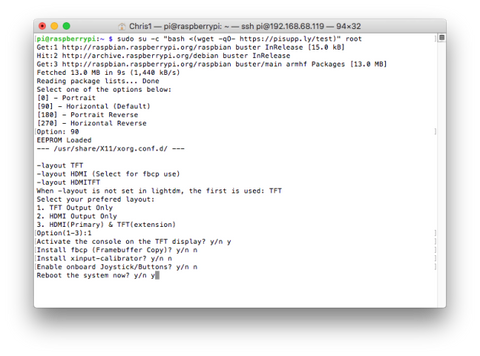
Remove the HDMI cable and then reboot your Pi hole.
Step 5 – Install PADD software. PADD (formerly Chronometer2) is a more expansive version of the original chronometer.sh that is included with Pi-Hole. PADD provides in-depth information about your Pi-hole. Open up there terminal window and type in the following:
wget -N https://raw.githubusercontent.com/jpmck/PADD/master/padd.sh
sudo chmod +x padd.sh
Add the following to .bashrc:
sudo nano ~/.bashrc
# Run PADD
# If we’re on the PiTFT screen (ssh is xterm)
if [ "$TERM" == "linux" ] ; then
  while :
  do
    ./padd.sh
    sleep 1
  done
fi
See the file with CTRL+O & ENTER then exit with CTRL+X. Before rebooting make sure the Pi hole boots to the command line by selecting the options in raspi-config:
sudo raspi-config

Finally reboot the Pi hole and after the Pi hole service has started the PADD will display on the TFT display.
