Add A Potentiometer to Your JustBoom Standalone Amp
This guide will show you how to install a potentiometer to your JustBoom Standalone Amp.
When on its own the Standalone Amp can accept an external input via its line-in connector.
Despite we only show a 10KΩ Log potentiometer several other types can be used. A logaritmic potentiometer from 10KΩ to 100KΩ should do the job.
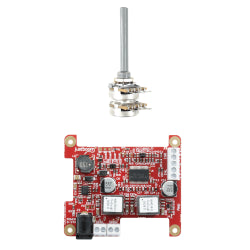
Identify on the PCB the location of the connector for the Line-In.
Use the picture on the left to help you find it.

Step 1 – In order to create a volume control for the JustBoom Standalone Amp you will need a logarithmic potentiometer and a suitable cable.
For potentiometer we used a 10KΩ but a logarithmic up to 100KΩ will also work.
We have used a 3.5mm jack to RCA cable but any cable which on one end has the connector to which you want to connect your player to will do just fine. Typically players e.g. Mp3 players, CD players, Tablets, etc. will have either a 3.5mm jack or RCA outputs.

Step 2 – Cut the cable so that you have e.g. 1mt where either your 3.5mm jack or the RCA are left attached to and one small 10-12cm which we will use to connect the potentiometer to the Amp.
Strip the end of the long cable and both ends of the short cable. Note that each cable has a copper shield and an additional wire within so be careful when stripping it as to not damage the core wire. Remove 3cm of external rubber protection to expose the shielding and 1cm off the core wire.

Step 3 – Tin all 6 ground shieldings and the 6 core wires.

Step 4 – Insert the grounds of both the right channels on the leftmost bottom hoop of the potentiometer and solder them in place.
Solder the right channel (Red one) of the small cable on the middle bottom hoop and the other right channel on the rightmost bottom hoop.
Do the same for the left channel on the upper hoops.

Step 5 – Connect the red and white wires to their respective + and – screw terminals but do not tighten the ground screws yet.
Using a paper clip or a solid copper core wire prepare an M shaped connector that you’ll use to wire the left and right grounds to the middle ground plane of the PCB via the middle screw terminal.

Step 6 – Your volume control is now ready.
Make sure to consult the “Amp Standalone” table on this page and the specs of the device that you want to connect to the Amp to make sure that you set the gain and the input voltage jumpers appropriately.
