Set Up Your JustBoom DAC And Case
This guide will show you how to set up the JustBoom DAC.
This guide has been updated in May 2017. If you bought a case before then you might want to follow the previous guide. You can tell them a part because the previous case used screws whereas the new uses bolts.

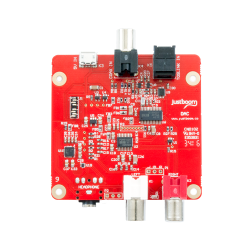
Unpack your JustBoom DAC.
You should find:
- 1 JustBoom DAC board
- 1 info card
- 1 Roon Labs voucher
- 1 Max2Play voucher
- 2 JustBoom stickers
Section 1 – Case Assembly
Step 1 – Unpack your JustBoom DAC.
If you are also installing the JustBoom AMP then skip to Section 2 – Case Assembly with the optional JustBoom Amp.

Step 2 – The JustBoom DAC and Amp case is the perfect enclosure for the JustBoom DAC.
After removing the protective film exercise a gentle outward lift at the base of the top part of the case as indicated by the arrows in the picture on the left.

This should allow you to detach the top cover from the bottom of the case.
Within the case you will find 4 rubber feet and 2 metal bolts. Here is how it will look like once opened.

Step 3 – To install the rubber feet on the bottom part of the case you will either have to push and twist them through one of the 4 the holes or help yourself with a small screwdriver to tuck in the top part of the feet within hole as shown below. Be careful not to cut through the feet and rather than using the tip of the screwdriver use the flat surface to push the head of rubber foot in.

Step 4 – Place the board onto one of the side panels so that it slots in the grooves as shown in the picture.

Step 5 – In the same way add the other side panel.

Step 6 – Place the board and the side panels in the bottom part of the case by making sure that the side panels are sliding within the plastic guides of the case. The small indentation of the bottom part of the case should be visible when looking at the case with the RCAs on the left and the Digital inputs on the right.

Step 7 – Place the top of the case on and as for when opening the case at the beginning, pull slightly the two sides of the bottom part of the case so that the plastic teeth can more easily slide in and hook on to the top part.

Your JustBoom is now ready.

Section 2 – Case Assembly with the Optional JustBoom Amp
The DAC can host the JustBoom Amp which sits on top of the DAC.
Step 1 – Remove the JustBoom Amp from it’s packaging.You should find:
- 1 JustBoom Amp board
- 4 metal bolts
- 4 plastic spacers
- 4 metal nuts
- 1 info card
- 1 Roon Labs voucher
- 1 Max2Play voucher
- 2 JustBoom stickers
To install the JustBoom Amp you will only require the 2 metal bolts, the 2 plastic spacers and 2 metal nuts.

Step 2 – Place the small plastic spacers on top of the DAC as shown here.

The first two spacers will have to be positioned on the side of the RCA connectors.

Step 3 – Align the JustBoom Amp on the DAC as shown here and join them together with two bolts and two nuts.

Step 4 – The JustBoom DAC and Amp case is the perfect enclosure for the JustBoom DAC.
After removing the protective film exercise a gentle outward lift at the base of the top part of the case as indicated by the arrows in the picture on the left.

This should allow you to detach the top cover from the bottom of the case.
Within the case you will find 4 rubber feet and 2 metal bolts. Here is how it will look like once opened.
Note the white spacers within the top part of the case, they will hold down the Amp on the DAC once the enclosure is closed.
Step 5 – To install the rubber feet on the bottom part of the case you will either have to push and twist them through one of the 4 the holes or help yourself with a small screwdriver to tuck in the top part of the feet within hole as shown below. Be careful not to cut through the feet and rather than using the tip of the screwdriver use the flat surface to push the head of rubber foot in.
Step 6 – Place the boards onto one of the side panels so that they slot in the grooves as shown in the picture.

Prepare the other two spacers and the two bolts coming from the case bag. You should easily distinguish them from the ones that came with the board as the former are slightly longer and thinner.
The spacers will go in between the two cards as shown in the step below.

Step 7 – In the same way add the other side panel. Also add the other two spacers and the two bolts coming from the case bag. You should easily distinguish them from the ones that came with the board as these are slightly longer and thinner.

Step 8 – Place the board and the side panels in the top part of the case by making sure that the side panels are sliding within the plastic guides of the case. The big opening of the top part of the case should be visible when looking at the case with the RCAs on the left and the Digital inputs on the right.
Finally screw the two bolts in to fix the board to the case.

Step 9 – Fit the bottom part of the case. The small indentation on it should be visible when looking at the case with the RCAs on the left and the Digital inputs on the right.

Step 10 – As for when opening the case at the beginning, pull slightly the two sides of the bottom part of the case so that the plastic teeth can more easily slide in and hook on to the top part.

Your JustBoom is now ready.
