
How to assemble your Media Centre HAT Case
Our media centre HAT case has been design to neatly house your Raspberry Pi and Media Centre HAT whilst still giving you access to the touchscreen and IR on the HAT. It also has some advanced mounting features such as suction cups for mounting on a flat surface and a handy little stand for your desktop, and also includes some rubber feet for stability when in operation. This guide will show you how to assemble the case and show you some of the mounting options and how to assemble those for use with your projects.
Whats in the box?
The Media Centre HAT Case will include the following parts:
- Media Centre Case (Blue/Red)
- 4x Rubber feet
- 4x Suction cups
How to assemble your case
Step 1– First you will need to snap off the corner mounts on the Media Centre HAT. The mounts are already scored so you can simply use a pair of pliers or something similar to snap those off.


Step 2 – Now you can stack the Media Centre HAT on top of your Raspberry Pi, carefully inserting into the 40 way GPIO header.

Raspberry Pi 4 B
Step 3 A– Take the bottom half of the case (Blue) and carefully slot in the Raspberry Pi and Media Centre HAT, making sure that the cut outs align with the connectors on the Raspberry Pi. Slide it in until it clips into place, you may also have to bend one of the side panels slightly.


Raspberry Pi 3B/3B+
Step 3 B – On the bottom half of the case where the Raspberry PI connector cutouts are, you should see that there are some areas which can be pushed out to allow access to the Raspberry Pi 3B/3B+ HDMI connector.
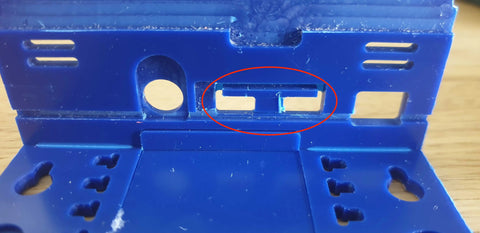
Carefully push this part from the inside to the outside of the case with a pointed or sharp object such as a small screwdriver. The plastic part should just pop out as per the below image.

Now slide in the Raspberry Pi and the Media Center HAT, making sure that the connectors will align with the cutouts of the case.


Step 4 – Take the top half of the case (Red) and carefully slide it over the bottom half, making sure that the drives slot in to the top half. Slide it over until it clips into place.


Mounting Options
There are a number of options depending on your project needs to mount, stand and hold your PiJuice Maker Kit case. Below is a list of options on how to do this:
Option 1 – Stand
If you want to use it as a touchscreen interface but need to angle it slightly so you can see the screen then we have built into the case a mini stand. The stand allows you to angle the case at different levels to suit your viewing. To use this you will need to remove the stand by sliding down and pulling out the at the back of the case and then insert the two corners into one of the free slots either side.

Option 2 – Desktop
At the bottom of the case there are 4 holes to insert rubber feet into them. This will allow you to stand the case on any flat surface and stop of from sliding around. To insert the rubber feet you will need to pinch the smallest rubber end slightly and push it in with a fine object such as a pen or pencil.

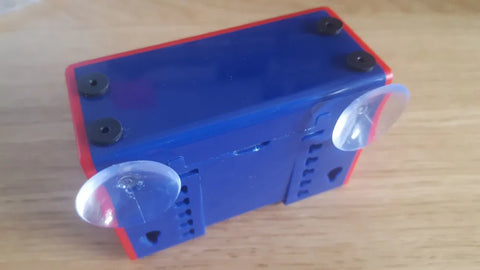
Option 3 – Suction cups
Suction cups are perfect for mounting onto a flat surface such as glass. It allows you to mount the PiJuice Maker Kit case to any glass surface providing it is flat. There are two suction cups provided which can be mounted at either the top or bottom half of the case and there are 4 slots provided in total, 2 on each side. To mount the suction cups simply slot the smaller knob into the largest hole in the case and the slide down to prevent it from falling out or coming loose.
Media centre HAT Buttons
There are 6 buttons that can be soldered on top of the media centre HAT to allow you to physically control its output. There are 5 tactile switches that can be used or 1 multi directional switch. Either way the case allows you to push the cutouts through for access. To apart the top half of the case a flip it over, yo should see 5 semi cutout holes.

Use a sharp object such as a small screw driver or knife to push the hole through to the other side. Be careful not to cut yourself when pushing the hole through. Once you have pushed through the required holes simply assemble the case.
