How to connect your Bluetooth Games Controller to your Raspberry Pi using RetroPie
Recent Versions of RetroPie 3+
The most recent versions of RetroPie include the packages needed for setting up a PS3 controller. Connecting over USB is Plug-and-Play–literally just plug your controller into the Pi while EmulationStation is running and it should detect a gamepad to configure. Connecting a PS3 controller via Bluetooth requires installation of a special PS3 driver located in RetroPie setup.
Note: These controllers have been tested using the latest version of RetroPie v4.6
Configuring a PS3 controller to connect via Bluetooth
Before booting the Raspberry Pi, make sure that a supported Bluetooth adapter is connected (for the Pi 3, onboard Bluetooth works perfectly as of RetroPie 4.0+). If you have a Playstation 3 console near by, make sure it is totally powered off–either unplugged or switched off in the back–because the PS3 controller may try to automatically pair with the console otherwise. While a separate powered USB hub is not required to set up a controller, be mindful of your overall power draw when attaching peripherals. If you are overclocking, for example, it will be much safer to use a powered USB hub than drawing current from the Pi itself.
After your Pi boots up, you need to enter RetroPie setup. You can do this one of two ways:
- Setting up your keyboard or PS3 controller as a USB gamepad in EmulationStation (you must configure a gamepad before you can use EmulationStation), navigating to the “RetroPie” icon in the Home Screen, and selecting it using whatever key you mapped “A” to on your gamepad.
- Pressing F4 to quit EmulationStation and running the Retropie script from the terminal. Once you’re in the terminal, follow these instructions to run the
retropie_setup.shscript.
Using the RetroPie GUI to configure the PS3 Controller Bluetooth Connection
Step 1 – Navigate to the “RetroPie” icon in the Home Screen and select it using whatever key you mapped “A” to on your gamepad, and go to RetroPie Setup

Step 2 – Once in the RetroPie GUI, choose [Manage packages] > [driver].

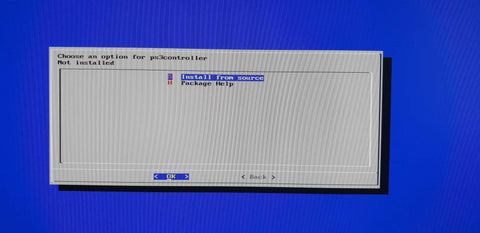
Step 3 – Select PS3 Controller Driver (“ps3controller”), and then select [Install from source].
-
- Go to
[Configuration / Options]>[Install/Pair PS3 Controller (Clone support Shanwan)]
- Go to


Step 4 – Once installation completes, exit RetroPie setup and return to the EmulationStation Home Screen.
Step 5 – Press “Start” to enter the EmulationStation Menu, and select Configure Input.
Step 6 – Disconnect your PS3 controller from USB. You should see the lights on it flash sequentially. The controller should now be connected via Bluetooth.
Step 7 – Emulation Station should now detect another gamepad connected. Hold any button down on the controller to begin configuring it.
And you now have a functional PS3 controller over Bluetooth.
Note: Do not enable other bluetooth options as these will conflict with the PS3 specific bluetooth setup (sixad)
FAQ
Input lags or problems to connect more than 2 players
Refer to here: Connection issues and input lags especially if you connect more than one BT device
Disconnect Bluetooth Controller
To disconnect the controller, hold down the ps3 button for 10 seconds.
Ghost inputs, controller sending key presses on its own
That’s a problem with the controller itself rather than RetroPie. The controller sends very short key presses (usually d-pad directions) that are commonly ignored by games, but might be noticed outside them. Even genuine brand-new controllers may or may not suffer this issue. The same problem has been observed on other brands like Buffalo and Wii. If analog input isn’t strictly necessary to you, you can try to map one of the sticks as a d-pad and adjust its dead zone if you still have phantom menu navigation.
