Getting Started with OctoPrint
Pi Supply and OctoPrint have partnered together to bring you the OctoPrint Starter Kit. The OctoPrint Starter Kit gives you full remote access and control of your 3D printer with its comprehensive software.

Whats in the Box?
- Raspberry Pi 3B+
- 2.5A Power supply
- OctoPrint Case
- micro SD card with OctoPrint software pre-installed
Getting Started
Note: If you have connected your Raspberry Pi to your network via Ethernet cable then you can skip to step xx.
Step 1 – Connect your Raspberry Pi to your HDMI TV/Monitor and insert your USB keyboard & mouse, which is required for the initial setup of OctoPrint. Insert your power adapter to a mains outlet and then insert the micro USB to the Raspberry Pi to power it up.
Step 2 – When the Raspberry Pi boots up it will first prompt you to enter the default login credentials which are username pi password raspberry
Step 3 – First we need to connect to your wireless network so we can access your network connected 3D printer. From the command line type in:
sudo raspi-config
Note: When using sudo for the first time you may need to enter your password again
Select option 2 “Network Options”

Select option “N2 Wi-Fi”

You will now be prompted to enter the name of your Wi-Fi network (SSID) and then the password.

Finally you will go back to the main menu where you can now select “Finish” to exit.

Your Raspberry Pi should have now connected to your local Wi-Fi router and sign an IP address.
Step 4 – Now that you have network access to the Raspberry Pi you can now connect to the OctoPi with either of the following URL’s in your web browser on your computer:
http://192.168.xx.xx
Your IP address if the Raspberry Pi will be displayed upon boot or you can type in the following command to see the IP address of “wlan0“:
ifconfig

Configure your OctoPi
When you connect to the OctoPi via the webpage you will see a Setup Wizard popup, which will allow you to initially configure some settings on the OctoPi. To get started click “Next” at the bottom of this page.
Step 1 – Access Control
On this page you will need to setup a username and password to login to the web interface of OctoPi. This will prevent any unauthorised users gaining access to your 3D printer and Raspberry Pi. Enter you credentials and then click on “Keep Access Control Enabled” and then “Next” to prcoeed.

Step 2 – Online Connectivity Check
This section will allow you to tell the OctoPi to regularly check that there is an internet connection. This ultimately prevents any resource intense operations from occurring. To enable this click on “Enable Connectivity Check” otherwise you can tell the octoPi to assume that internet is always connected by disabled this “Disable Connectivity Check“. Click “Next” to proceed.

Step 3 – Plugin Blacklist
This prevents some third party plugins that may have severe issues with known versions of OctoPi. It allows you the chance to update the plugin before they may cause issues. By default there is an updated list on the OctoPi which you can manually look at. Select one fo the options here to Enable or Disable this feature and the click “Next” to proceed.

Step 4 – Slicing Profile
If you plan on using the OctoPi to do the slicing then you will be required to import a slicing profile using the CuraEngine, otherwise you can do the slicing locally on your computer.

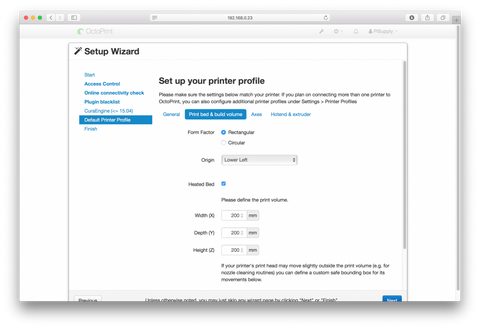
Step 5 – Printer Profile
Here is where you configure your printer settings such as dimensions, axes and extruder settings. It is very important that these settings are correct as you may occur issues later when printing. You can also change these printer settings later on.
Step 6 – Finish
Finally read the safety information brief and click on “Finish” to finalise the setup wizard.

When complete you will be presented with the OctoPi homepage.

For further information on the various settings and configurations of OctoPi you can visit http://docs.octoprint.org/en/master/